You See Our Blogs!
See & Xplorer Our Blogs!

Jul
22

Hi blog readers Cyd!

Buat yg sudah jadi bubur memiliki gadget Lenovo tipe A859 alangkah baiknya men-non aktifkan fungsi2x yang terdapat pada aplikasi Security tsb. Salah satunya update database antivirus

Cyd! Menggunakan update terakhir Juli 2015 koneksi data internet telkomsel mengalami kendala (ora iso ng’net)

After reset ke mode pabrikan..alhamdulillah waze dan posisi GPS yg awalnya ora iso skg jadi ISO…

:)

Apr
05

ACR (Avaya Contact Recording) interkoneksi ke AES (Avaya Enablement Services)

ACR : 192.168.4.111

AES : 192.168.4.208

Kondisi : DMCC dan TSAPI, pada ACR sudah UP (terkoneksi ke service Tsapi dan DMCC AES)

Pada server ACR lakukan hal sbb :

root@LRCACR01 craft]# netstat -plan | grep 192.168.4.208
tcp 0 0 ::ffff:192.168.4.111:46993 ::ffff:192.168.4.208:4722 ESTABLISHED 2335/java
tcp 0 0 ::ffff:192.168.4.111:42768 ::ffff:192.168.4.208:1066 ESTABLISHED 2335/java
[root@LRCACR01 craft]#

Pada server AES lakukan hal sbb :

[root@aes craft]# netstat -plan | grep 192.168.4.111
tcp 0 0 ::ffff:192.168.4.208:4722 ::ffff:192.168.4.111:46993 ESTABLISHED 13363/java
tcp 0 0 ::ffff:192.168.4.208:1066 ::ffff:192.168.4.111:42768 ESTABLISHED 13188/tsrv
[root@aes craft]#

Terlihat, DMCC menggunakan port 4722 Tsapi menggunakan port 1066.:

#!/bin/bash
A=`netstat -plan | grep -v grep | grep 4722 | wc -l`
if [ “$A” -eq “0” ]
then
echo “LINK DMCC DOWN” > “/home/craft/dmccstat/dmccDOWN.$(date)”
#else
#echo “LINK DMCC UP”
fi

==============================================================================

#!/bin/bash
A=`netstat -plan | grep -v grep | grep 1066 | wc -l`
if [ “$A” -eq “0” ]
then
echo “LINK TSAPI DOWN” > “/home/craft/tsapistat.tsapiDOWN$(date)”
fi

Apr
05

Hi blog readers Cyd! how are you?

Jika ada menemui kasus sebagai engineer yang sedang mengkonfigurasi server dengan kondisi baik si server dan laptop tidak terkoneksi ke jaringan Internet, lalu blog readers Cyd! kesulitan untuk menyelesaikan problem solving dan membutuhkan pertolongan/bantuan dari rekan atau boss. Maka blog readers Cyd! akan pasang modem gsm/cdma dengan berharap memasang TeamViewer terkoneksi!dan rekan/boss bisa langsung remote laptop tapi..eng ing eng…koneksi ke server/jaringan tempat laptop Anda terkoneksi ke intranet tidak dapat diakses….dan disinilah dibutuhkan re-routing sbb :

ip laptop :

IPv4 Address. . . . . . . . . . . : 192.30.22.69
Subnet Mask . . . . . . . . . . . : 255.255.255.128
Default Gateway . . . . . . . . . : 192.30.22.1

ip server server di intranet yang sedang anda remote

192.30.19.201

pada CMD klik kanan “Run as Administrator”

route ADD 192.30.19.201/25 MASK 255.255.255.128 192.30.22.1

crosscek dengan perintah router PRINT dan ping ke 192.30.19.201 apakah bisa di Ping sementara Anda mempunya 2 koneksi Intranet & Internet (GSM/CDMA)

Cyd!

May
23

Dear rekan blog readers Cyd!

JIka sekiranya blog readers Cyd! melakukan remote dan menjalan aplikasi pada server linux, dan prosess aplikasi tersebut dapat berjalan di background dan dapat dibuat resume (ketika terminal mendadak terputus / exi terminal) rekan blog readers Cyd! dapat menggunakan aplikasi screen

contoh :

screen tcpdump > tes.txt

lalu tekan pada tombol keyboard

ctrl – a – d

untuk memasukkan proses perintah tcpdump ke background

untuk kembali ke perintah ketikkan screen -r

jika muncul seperti ini

[root@server ~]# screen -r
There are several suitable screens on:
        10480.pts-0.server      (Detached)
        11088.pts-0.server      (Detached)
Type “screen [-d] -r [pid.]tty.host” to resume one of them.

maka gunakan perintah screen -d -r 10480 <– ini nomor PIDnya

dan ketik screen -r

Cyd!

Apr
23

Dear bloggers Cyd!.

Eheum…sekarang Cyd mulai memapaki dunia telekomunikasi..semoga berlanjut ke jenjang lebih tinggi…Avaya yep sekarang “cocoannya” PBX Avaya

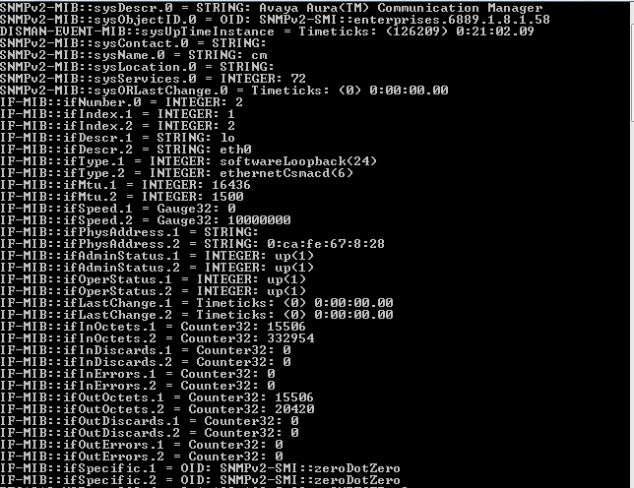
konfigurasi snmp pada communication manager versi 6.x

GambarGambar


Gambar

testing menggunakan snmpwalk, apakah tercapture informasi snmp (MIB, etc)

Cyd!


Mar
26

In SQL Server Management Studio Object Explorer, right-click the server, and then click Properties.

On the Security page, under Server authentication, select the new server authentication mode, and then click OK.

In the SQL Server Management Studio dialog box, click OK to acknowledge the requirement to restart SQL Server.

In Object Explorer, right-click your server, and then click Restart. If SQL Server Agent is running, it must also be restarted.

To enable the sa login

In Object Explorer, expand Security, expand Logins, right-click sa, and then click Properties.

On the General page, you might have to create and confirm a password for the login.

On the Status page, in the Login section, click Enabled, and then click OK.


thanks MS

Cyd

Mar
26

You must be logged on as an administrator or a member of the Administrators group to complete this procedure. If your computer is connected to a network, network policy settings may also prevent you from completing this procedure.

Click Start, point to Settings, click Control Panel, double-click Add or Remove Programs, and then click Add/Remove Windows Components.

In Components, click Management and Monitoring Tools (but do not select or clear its check box), and then click Details.

Select the Simple Network Management Protocol check box, and click OK.

Click Next.

Insert the respective CD or specify the complete path of the location at which the files are stored.

SNMP starts automatically after installation.

This completes the installation process. To configure SNMP agents respond to SNMP requests, refer to Configuring SNMP agents.
===========================================================================================================
onfiguring SNMP Agent in Windows 7, XP, 2008 and 2003 Systems

For details about installing SNMP agents in Windows systems, refer to Installing SNMP Agent on Windows Systems.


To configure SNMP agent, follow the steps given below:

Click Start, point to Settings, and then click Control Panel. Double-click Administrative Tools and then double-click Computer Management.

In the console tree, click Services and Applications and then click Services.

In the details pane, scroll down and click SNMP Service.

On the Action menu, click Properties.

On the Security tab, select Send authentication trap if you want a trap message to be sent whenever authentication fails.

Under Accepted community names, click Add.

Under Community Rights, select a permission level for this host to process SNMP requests from the selected community.

In Community Name, type a case-sensitive community name, and then click Add.

Specify whether or not to accept SNMP packets from a host:

To accept SNMP requests from any host on the network, regardless of identity, click Accept SNMP packets from any host.

To limit acceptance of SNMP packets, click Accept SNMP packets from these hosts, click Add, type the appropriate host name and IP or IPX address, and then click Add again.

Click Apply to apply the changes.

Thanks OPManager

Cyd